Midi Tween
Tween animation using midi as input
Last updated
Tween animation using midi as input
Last updated
Maps midi notes to any numeric or color property to drive animations synchronized to audio. While midi is traditionally used for playing music, Timeflow uses it to play graphics and animations. Midi Tween can be used to create all sorts of behaviors and effects from simple flashing colors to advanced setups mapping midi notes across a series of objects.
Midi Tween has just 1 channel when initially setup, though more channels may be added.
Select the object to view its settings in the Inspector.
Select which track in the Midi File to use as input. Only 1 track may be selected.
Selects which notes are used for input.
All midi notes in the selected track are played without filter. Use this when any note will do.
Filters the notes by a minimum and maximum value.
Use ranges to separate the notes from a single track across multiple instances of Midi Tween, or simply to play select notes and ignore the rest.
Respond only to a single note index and ignore all others.
Use this mode to affect the same property value on multiple objects, with each mapped to a specific note. Usually the objects are children of the current object, though may be any collection of game objects you wish.
Use Multiple Targets to relate each note or range of notes to a specific object.
This mode is similar to Multiple Targets, however instead of mapping a specific note to each object, each object is triggered next in sequence for each note played.
Use Sequence Targets when a specific note-to-object mapping isn't needed and you simply want the objects to react in order with each subsequent midi note, regardless of which note is played.
Sets the minimum threshold to ignore any notes played under the specified velocity. Set to 0 to allow all notes to playe regardless of velocity.
This lists the note indices being played at any given time in the midi track. This is helpful to identify which notes specifically are being played.
If enabled, the target object is activated (gameObject.activeSelf) when a note is played. Use this to reveal inactive objects when notes are played.
Rebuild the list using Gather Children. This also assigns the notes in the track to the objects sequentially, so that each object reacts to a separate note. The notes may be customized manually and set to ranges instead of individual notes. Multiple objects may respond to the same note if desired. It's also possible to set a minimum velocity to ignore any notes played too softly.
Property mappings may be assigned manually per object, however be aware that targeting different types of properties may result in unexpected behavior.
Gather Children overwrites all properties with new assignments, so do not use it if you've made changes to any properties or added channels manually.
If the property cannot be found on the target object, a warning is displayed to "Please Select a Property".
If this occurs, try selecting a different property of the first one listed, then press Gather Children again to reapply the property mapping to all objects. If the warning continues to occur, check that the target objects have the property (i.e. has the same material or component in question).
When using multiple targets, each property is listed in the Timeflow view in its own channel. These channels are read-only and output the processed note values with the ADSR envelope applied.
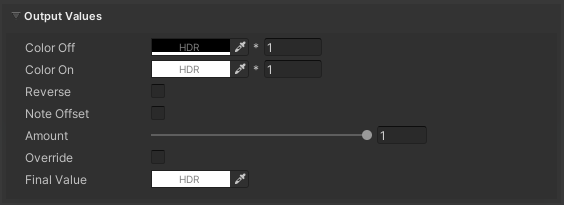
Forward: Objects are processed from first to last (top to bottom) as listed.
Reverse: Objects are processed from last to first.
Random: Objects are triggered randomly based on the random seed set.
Skip: Objects are triggered in order skipping every X number.
Skip Reverse: Same as Skip, but in reverse order.
When using Multiple Targets or Sequence Mode, you can bulk add object properties using these buttons. To add selected objects, first lock the Inspector window (lock icon in the upper right corner) so that the target objects can be selected without changing the inspector view.
Use Increment mode for creative animation effects where each note hit moves closer towards a goal, whether that be a position, color, or other even the interpolation of another animation.
Each note in a midi file has a velocity value which corresponds to the intensity of the note. This is akin to whether a note is being played softly or aggressively. With Midi Tween the velocity values can be used in one of the following ways:
Don't use note velocity. Use this mode to play every note the same regardless of its velocity.
Applies note velocity as an intensity factor affecting the final output value. This is perhaps the most true interpretation of velocity since it makes the effects of harder played notes more visible than softer played notes.
Sets the time (in seconds) it takes for a note to ramp to full intensity from the moment it is played. A note with no attack (0) plays instantaneously at full strength, while an attack of 1 would take a full second for the value to interpolate from off to on while the note is being played.
If enabled, the behavior begins reacting to a note before it starts playing so that the peak of the ADSR curve (when the attack is at maximum) lines up with the audible sound of the note.
This is a key feature that gives Midi Tween a huge advantage over Audio Reactive for music synchronization. One way to visualize this is to imagine watching someone strike a hammer on an anvil. You would see the hammer swing down a moment before you hear the sound of the hammer. The movement prior to the sound is the anticipated attack and plays a major role visually in how audio synchronization is perceived.
On the other hand, when using audio-reactive behaviors, the sound can only be responded to at the time it is heard making it impossible to anticipate in advance.
Sets the time it takes to go from the full attack intensity to the sustain level. If a value of 0 is entered, there is no transition from the attack to the sustain level.
This sets the holding value of the note once attack and decay have completed.
If a value other than 0 is entered, the note played may only be held (sustained) for the duration entered. This may be helpful to shorten really long midi notes, forcing them to release once the max duration has been reached.
Sets the time it takes for the note to fully stop playing after the note has been released. This can be thought of as a remaining resonance or fade back to the resting state.
For tighter music synchronization, a short Attack and a longer Release is recommended. This make the Midi Tween respond more instantaneously to each note as it is played, and to gradaully return back to its resting state. How long the release is depends on how frequently the notes are played and the effect desired.
Set the resting "off" value and the full intensity "on" value for the property being targeted.
Multiplies the on and off values. This can be useful to increase or decrease the intensity without changing the value directly.
If enabled, the on and off values are swapped, interpolating in reverse order.
If enabled, the note played offsets the final value based on its position in the scale (note index) multiplied by the Increment amount.
If enabled, rather than using the full note range (0-255) the offset is based on the lowest note in the track. This is often helpful when the midi track uses only a small note range (ex. 36-42) so that the offset amount starts at 0 from note 36 and up. Otherwise if disabled, each note played multiplies the increment offset by the full note value.
Sets the amount to increment for each note index.
Use this slider to blend the output back to the off value. This can be used to decrease the intensity of the Midi Tween effect overall and may be animated to control midi influence over time.
Blends the override value with the final result of Midi Tween. A value of 1 is full override.
Use override to take control over Midi Tween during parts of animation. The override value may be animated or linked with another behavior, allowing the midi animation to blend on and off as needed with other channels.
Displays the final output value. This field is read-only and displayed only for reference.
Note that audio playback features do not provide blending or ramping volume on and off. These are experimental features with limited use case.
Plays the audio clip once per note played.
Use this mode with an audio clip that lasts the full duration of Timeflow. Each time a note is played, the audio plays for the duration but remains aligned to the start of the scene.
This mode plays the audio clip resuming from that last point played. Each midi note plays the audio for the note duration, then stops until the next note is played.
Use shader globals to animate material settings and colors across all shaders supporting the named keyword. This is an efficient way to animate material properties across multiple objects without having to deal with material references. This works with standard shaders as well as Shader Graph properties that are not exposed.
This is an advanced feature for integrating Midi Tween with other scripts. When Send Message is enabled, each midi note detected invokes the method OnMidiNote(MidiNote note). Any scripts on the same game object which implement this method are invoked.
For code reference, please refer to OnMidiNoteEventHandler in MidiTween.cs at line #195.
If enabled, the final output value is not applied and only message is sent on each midi note played. This could be used to implement custom behavior through a script and use Midi Tween to process notes, which it passes to the script to handle.
Enable this to disable message sending in edit mode and only send messages at runtime. Use this if the scripts being targeted do not operate in edit mode.
This is similar to override, however instead of overriding the value it overrides the interpolation between values.
If Remote Control is enabled, midi notes no longer drive the behavior and instead the Remote Value sets the interpolation between the off (0) and on (1) value directly.
If this option is enabled, the remote value is added to the current midi processing instead of overriding it. Use this mode if you wish to use both midi file input and remote control simultaneously.
For common features, please see and .
Assign the providing the midi data.
Use the section to get an idea of which notes are being played when.
If enabled, multiple notes are allowed to play simultaneously and overlap, affecting how is calculated. Otherwise, each note is played individually and is interrupted by subsequent notes.
Disable polyphonic if the desired behavior is to play each note starting from the full off value, otherwise the computed value is cumulative and only returns to full rest once the note has fully played out (controlled by ).
This button also maps the notes to the objects when using .
This section changes depending on whether or is selected, though with typical settings it displays the single property being mapped to (same as in the Menu Bar above).
This section is displayed only when mode is set to Multiple Targets. Each target object is listed with its own property mapping, output channel, and note selection.
Toggle the graph icon to show/hide the midi notes in the Timeflow view. These notes may not be selected or modified and are only for visual reference.
Midi Tween channels may be linked to other channels using . The output value is the note intensity from 0 to 1.
This section is only displayed if the mode is set to Sequence Targets. This is similar to Multiple Targets, however instead of mapping each object to a note range, objects are triggered in sequential order no matter which note is played.
Notes are processed using an ADSR envelope (Attack, Delay, Sustain, Release). Please refer to the glossary for an explanation of .
Attack, Decay, and Release each have drop-down to select interpolation. For further information, please see .
Each note is played normally and mapped to the full range of the .
Each time a note is played, it progresses 1 step forward and increments by the amount specified by . When the number of max steps has been reached (that many notes have been played) then it resets and starts the progression over.
This reduces the time based on the note velocity. This has the effect of making harder played notes more immediate while softer played notes ramp up gradually, according to the Attack setting.
This has the effect of shortening the duration of notes when they are played softly, while allowing louder notes (high velocity) to sustain longer, based on the setting.
Note that the value fields are based on the data type of the .
If mode is selected, sets the value to increment by with each step. The full "on" value is only reached after the increment is added up to the Max Steps, then it starts again from the "off" value.
If enabled, the final output value is overridden or blended with the override value, which may be a constant value, animated, or linked using .
An audio clip may be assigned to be triggered whenever a midi note is played, according to the selected for input.
If enabled, the final value is applied to the named shader global using , or corresponding method matching the property value type.
If enabled, instead of using , is used. This operate in much the same way, however includes all child objects and descendants of the current object. This could be used with multiple targets when each has an instance of a custom script that performs additional note processing.